
As a game developer, the way you control the music Jukebox streams into your game is by creating one or more Playlists. When it is instantiated within your game’s run-time environment, a Jukebox.IPlaylist component is connected to a Unity AudioSource. Once connected, the Playlist provides a stream of one or more audio tracks into the game, to be managed and mixed by your game’s logic in the same way as it would manage any other AudioSource. If you want to have multiple different types of music in a game scene, then you simply create multiple Playlist objects, and switch between them as the player progresses through the game scene. (Note: in order to ensure only one Playlist is playing at a time it is necessary to tell the Jukebox Plug-in which is the active playlist. See the Jukebox.IControl docs for more information).
In order to define exactly what music is played by each in-game Playlist object, you must create one or more Playlists on the Jukebox Web Site. There are a number of different playlist types you can create, that give you varying levels of control over the music associated with the Playlist. These are as follows:
- Manual Playlists: manual playlists provide the greatest level of control. You may choose specific tracks in the Jukebox catalogue to be included into the playlist.
- Auto-Generated Playlists: created in the same way as a manual playlist, rather than just playing the track(s) you select, Jukebox will use an AI matching algorithm to find other tracks in the Jukebox catalogue that sound similar to your selected tracks. This allows Jukebox to provide the gamer with variety and interesting new tracks, whilst still ensuring the ‘vibe’ of the music stays close to what you intended.
- Genre-Specified Playlists: you can specify a genre, and Jukebox will play a selection of tracks of that genre.
- Tag-Specified Playlists: you can specify a textual tag, and Jukebox will play a selection of tracks that include that string in their tag field.
Creating Playlists
To create a new Playlist, sign-in to the Jukebox Web Site with a developer account. Once logged in you will be taken to the Developer Profile page; which you can also reach by clicking the ‘User’ icon in the top navigation bar, and selecting ‘Developer Profile’. On this page you will notice a large ‘Create Playlist’ button, labelled ‘+’ in the bottom right-hand corner:

Upon clicking this button, you will be taken to the Playlist Management page for the new playlist; which looks as follows:
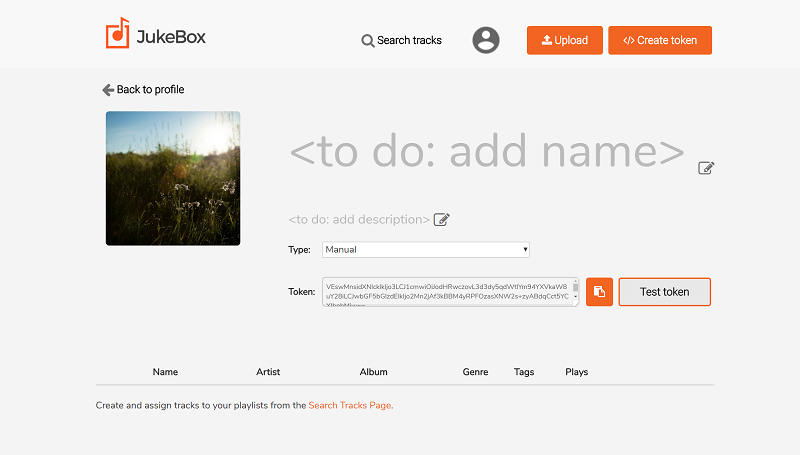
This page allows you to provide a name and optional description for you playlist; and also allows you to define the type of Playlist. The various playlist types are described in more detail below.
Adding Tracks to Manual Playlists
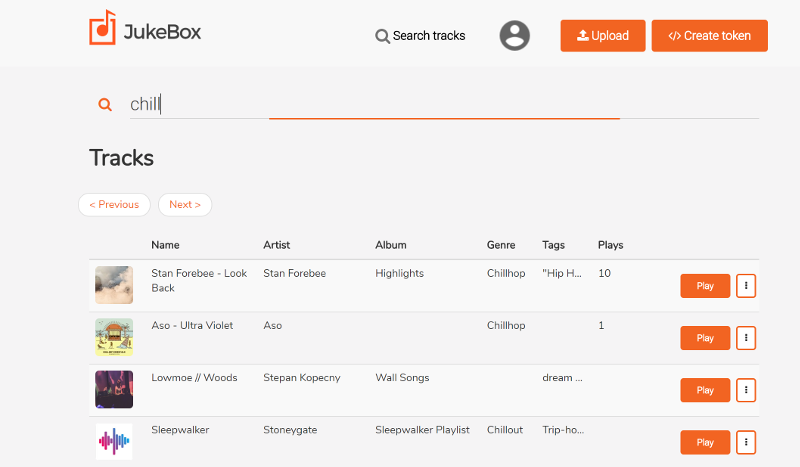
By default, Playlists are created as ‘Manual’, and once you have created a Playlist of this type, you can add search and add tracks to the playlist by clicking the ‘Search Tracks’ button in the navigation bar at the top. Once the search box is showing you may search for tracks based on: Track Name, Artist Name, Genre or Tag. As you type, matches for the search term are displayed as follows:
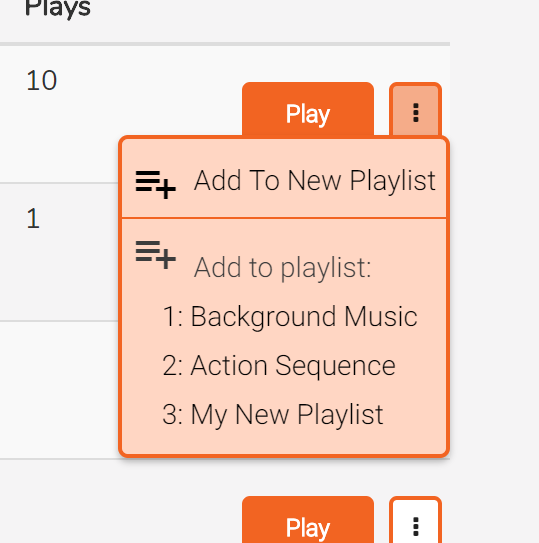
Once you have a set of search results you may preview the tracks by clicking Play; or add them to one of your playlists by clicking the menu button to the right of the Play button. This presents a context menu with options to add the track to any of your existing playlists; or else to create a new playlist and add the track to this; as follows:
In this way you can search through the Jukebox catalogue to locate tracks that you want included in the playlist. Clicking the ‘Play’ button to the left of each track in the main track-list, or just clicking on the track name in the playlist panel, allows you to listen to the track.
Previewing Your Playlist
Once you have defined your playlist, you may manage and preview the playlist by returning to your Developer Profile page (via the user menu in the Navigation bar), and then either clicking the Playlist name, or selecting ‘Edit Playlist’ from the Playlist’s context menu.
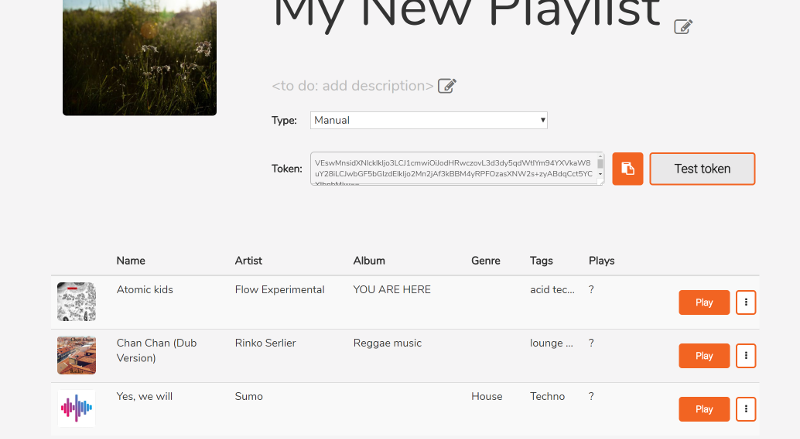
Once on a Playlist’s management page you will be able to see the tracks you have just added, as follows:
On this page you can now preview individual tracks; or the Playlist as a whole; which you can do by clicking the ‘Test Token’ button. You can also remove tracks from the Playlist using the context menu button of the appropriate track.
You can also now change the Playlist type, and preview the effect this has by clicking the ‘Test Token’ button.
Exporting Your Playlist
Once you have the Playlist configured the way you want it to be (see below for more information about the other Playlist types), you can export the Playlist for use in your games by clicking the ‘Copy to Clipboard’ icon to the left of the ‘Test Token’ button. This copies the base64-encoded Playlist token to the clipboard, ready for pasting into the Unity Development Environment. See here for instructions of how to complete this final step towards getting your playlist streaming into your game.
Creating Auto-Generated Playlists
An Auto-Generated playlist is created in exactly the same way as a Manual Playlist (see above). In this case, however, the tracks you specify for the playlist aren’t the only tracks that will be played. Jukebox contains an A.I. system that uses these tracks as seed tracks to generate a playlist containing similar-sounding tracks that it can find within the Jukebox catalogue.
Using this type of Playlist means that the music will always match the vibe you are looking for within your associated game scene; but Jukebox will be able to give your game-players variety, and introduce them to new tracks as they are uploaded into the Jukebox catalogue. In future, it will also mean that Jukebox will try to find tracks that sound like your seed tracks, but which match the genres the game-player likes most.
Turning a Manual Playlist into an Auto-Generated playlist is very simple – simply select a Playlist Type of ‘Auto-Generate’ in the ‘Type’ drop-down menu of the Playlist Management page.
Other than that, use of an Auto-Generated playlist is exactly the same as using a Manual Playlist.
Creating Genre-Specified Playlists
To create a Genre-Specified Playlist, select this type from the ‘Type’ drop-down menu on the Playlist management page. Upon doing this, any tracks associated with the Playlist will disappear (this can be retrieved by returning the Playlist type to something that uses assigned tracks), and a ‘Selector’ field will appear instead, as follows:

To specify the genre to match, add the genre name as the ‘Selector’ text. Genre tokens will play tracks that have been uploaded to the Jukebox catalogue with their ‘Genre’ metadata field set to a value that matches the one you specify. This match is case insensitive; but it has to be an exact match. For instance, a specified value of ‘Rock’ will match the genres ‘Rock’ and ‘rock’; but it won’t match ‘Rock & Roll’.
Once generated, this token may be tested, copied, and inserted into a Unity project in exactly the same way as described for Manual Playlists.
Creating Tag-Specified Playlists
Like the Genre-Specified Playlist, to create a Tag-Based Playlist you simply select this type in the ‘Type’ drop-down menu of the Playlist management page, and then enter a Tag string as the ‘Selector’ text.
Tag tokens will play tracks that have been uploaded to the Jukebox catalogue with their ‘Tags’ metadata field set to a value that contains the string you specify. This match is case insensitive, and it will match any track who’s tag field contains the string you specify as a sub-string. For example, a specified value of ‘ambient’ with match ‘Ambient’, ‘ambient’ and ‘ambient synths’
Once generated, this token may be tested, copied, and inserted into a Unity project in exactly the same way as described for Manual Playlists.